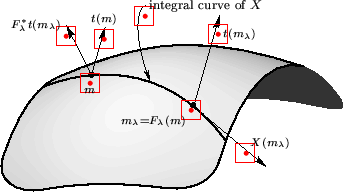
The previous example shows how labels can be accurately positioned, using the locations of the marked points of the first example. The marked points are away from ``busy'' parts of the graphic. They indicate where labels can be placed near to that part of the image being labelled yet not interfere unduly with other parts of the image.
While this is an intuitive strategy for selecting places to be marked, it can mean that adjustments, by ``nudging'', are required to position the labels to best effect. Some trial-and-error is usually required before finalising the positions of all labels by choosing the best <factor>s.
\WARMprocessEPS{Fig5.4.1}{eps}{bb2}
\renewcommand{\labelmathstyle}{\scriptstyle}
\renewcommand{\labeltextstyle}{\footnotesize}
\begin{xy}
 \xyMarkedImport{}
\xyShowMarkPoints{*++[red][F-:red]@{*}}{-}
 \xyMarkedMath +!DR{1}
 \xyMarkedMath +++!D{2}
 \xyMarkedMath +!U{3}
 \xyMarkedTxt +!DL{4}
 \xyMarkedMath +!L{5}
 \xyMarkedMath +!UR{6}
 \xyMarkedMath +!DL{7}
\end{xy}
When the marked points are chosen this way, the labels can usually be well positioned by specifying just margins and an edge or corner to be where the reference point of the label should occur. There is little need for delicate nudging and <factor>s.
On the other hand, extreme accuracy is not at all necessary when choosing positions for the marked points. In this article, the .bb files were generated using low-resolution preview images. These need not be accurate scaled-down versions of the higher resolution images rendered by POSTSCRIPT. Inaccuracies can be compensated for using XY-pic adjustments.
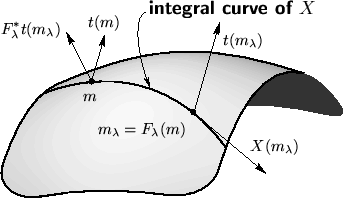
Another significant advantage of this strategy becomes apparent when the image or labels need to be resized or restyled, perhaps for use in a different context. This will almost certainly change the relative size of the labels and the image. Smaller-sized labels remain anchored to places near to what they refer. On the other hand, relatively larger labels can have been anchored so as to expand over portions of the image that are otherwise empty. In either case there may be no need to make any adjustments to the coding of labels.
\WARMprocessEPS{Fig5.4.1}{eps}{bb2}
\renewcommand{\labelmathstyle}{\displaystyle}
\renewcommand{\labeltextstyle}
  {\large\bfseries\sffamily}
\begin{xy}
 \xyMarkedImport{}
 ...
 ...
\end{xy}
Although the above examples have used LATEX, the WARMreader macros work equally well with plain TEX, and most other formats, as does XY-pic. The only requirement is to be able to import the graphic and customise the expansion of a single macro, \xyWARMinclude, to suit. This macro takes as argument the name of the image file. As a practical default, it expects to be able to use the \includegraphics command from LATEX's graphics package:
\def\xyWARMinclude#1{\includegraphics{#1}}
This definition can be overridden by replacing the \includegraphics with \psfig or \epsfig or \epsfbox or other command for placing an imported graphic within the TEX or LATEX document.
There must be only one argument for the filename.
The result should be an \hbox of exactly the size required
for the image to occupy. (This is so that
\xyWARMinclude{<filename>} can be used
as the argument to an \xyimport command.)
Note that some macros for including graphics are not suitable. For example, the \centerpicture macro from TEXTURES' picmacs.sty file cannot be used since it inserts stretchable `glue' to span the whole page width; on the other hand, \picture from the same file can be used.
The requirements stated in the previous subsection allow scaling, rotating and resizing of imported graphics. For example, a rescaling can be achieved using LATEX as follows:
\newcommand{\scaledfig}[2]
  {\scalebox{#1}{\includegraphics{#2}}}
\renewcommand{\xyWARMinclude}[1]
  {\scaledfig{.7}{#1}}