The next examples have been used for teaching elementary mathematics.
They were constructed using the Mathematica [7] software package
and saved in EPS format.
In fact there is more than one way to do this with Mathematica,
which can produce .eps files having quite different
structure and properties.
The first example is in direct analogy with techniques discussed already.
Extra considerations apply when the .eps file
contains an %%AspectRatio comment, as in later examples.
The Mathematica Front-End software allows for ``point-&-click'' on images to obtain coordinates,3in the coordinate system used to calculate the image contents. This technique was used to create data files for the remaining examples; an extension .mbb indicates their origin.
\WARMprocessMMA{Q1}{eps}{mbb}
\renewcommand{\xyWARMinclude}[1]
  {\scaledfig{.7}{#1}}%
\begin{xy}
\xyMarkedImport{}
\xyMarkedPos{para}*+{}
  ,\ar@{<-}+(.7,25)*+!D\txt{base of parabola}
\xyMarkedPos{cub1}*++{}!D(.6),\ar@{<-}-(3.5,15)
 *+!U(.8)\txt{turning points\\of a cubic}="cub"
\xyMarkedPos{cub2}*++{},\ar@{<-}"cub",
\xyMarkedPos{neg1}*++{},\ar@{<-}+(.5,-25),
 *+!L(.6)\txt{local minima}="min"
\xyMarkedPos{neg2}*++{},\ar@{<-}"min",
\end{xy}
Click at the four edges to get the bounding-box information.
Some manual editing is needed to put this into the form shown
below.
The TEX source uses the macro \WARMprocessEPS
to read size and marked-point data.
Having just a symbolic label for each point
is quite sufficient for
the next figure,
in which the marked points are not where labels occur
but are near the endpoints of arrows.
Positions for the labels are determined relative to these arrow-ends,
using XY-pic commands. Notice how some labels are positioned relative
to one marked point, then used to draw an arrow to another.
LDRU:{-3.89059, -43.2333, 4.21704, 43.0523}
StartData
,{1.5145, 5.44064, para}
,{2.03422, -9.67778, cub1}
,{-1.01481, 17.6091, cub2}
,{0.96013, 2.49071, neg1}
,{-1.04945, 2.49071, neg2}
EndData
|
%%BoundingBox for a square enclosing the image.
 |
The ``aspect ratio'' (i.e. height/width) of the rectangle must be known to handle such graphics correctly with WARMreader. This can be obtained from the .eps file, where it is given as a PostScript-like comment; it must be supplied as the first line in the .mbb file. The \WARMprocessMMA macro is replaced with a variant called \WARMprocessMMAR. Such images sit badly in a TEX document without removing the extra space below, when the aspect ratio is greater than 1, or at left and right, when the aspect ratio is less than 1. This explains the \vskip command in the following listing for the above figure.
\WARMprocessMMAR{QA1}{eps}{mbb}%
\renewcommand{\xyWARMinclude}[1]
{\scaledfig{.7}{#1}}%
\newcommand{\Xhair}{%
\drop[thinner][red]+[o][F-]@{x}}%
\begin{xy}
\xyMarkedImport{}
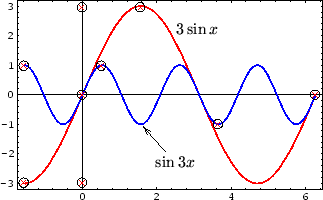
,(0,0)\Xhair,(0,3)\Xhair,(0,-3)\Xhair
,(6.2831,0)\Xhair,(-1.5708,1)\Xhair
,(-1.5708,-3)\Xhair,(1.5708,3)\Xhair
,(.5236,1)\Xhair,(3.6652,-1)\Xhair
\xyMarkedPos{3sinX},*++!L{3\sin x}
\xyMarkedPos{sin3X}*+{}
,\ar@{<-}+(.7,-1)*+!U!L(.4){\sin 3x}
\end{xy}%
\vskip-3.5\bigskipamount
%%AspectRatio: .61803
%LDRU:{-2.42465, -3.80861, 6.6868, 3.25092}
LDRU:{-2.18, -3.57, 6.50, 3.24}
StartData
,{2.29262, 2.27719, 3sinX}
,{1.54949, -0.927998, sin3X}
EndData
In most cases this is enough for good placement of labels over the imported image; fine-tuning can be done using XY-pic modifiers, as described earlier. If greater accuracy is required in establishing the coordinate system over the image, some tweaking of the bounding-box may be done inside the .mbb file, as in the third line of the above listing for the previous example. The second line, which shows the coordinates obtained from edges of the preview image, has been suppressed to allow the following line to give modified values. Note how the cross-hairs have been accurately positioned.
A further complication occurs when the graphic contains wide axis labels or tick marks. Now not all edges of the preview image need correspond to edges of the bounding box, when printed on the page. Mathematica rescaled the preview to include the axis labels but, on the printed page, the main part of the image is larger, with the axis labels extending into the extra space due to the aspect ratio.
 |
To get best positioning, some visual estimation is required.
An extra offset parameter is supplied with the %%AspectRatio comment,
to measure the extent that labels would fall outside the bounding-box,
if it had been rectangular, not square.
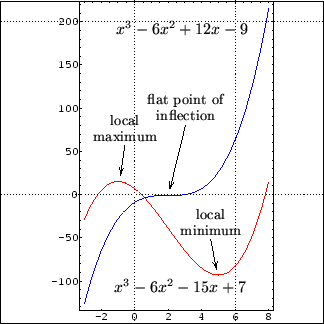
%%AspectRatio: 1.6 :1.294
%LDRU:{-5.24417, -171.787, 8.21328, 248.046}
LDRU:{-3.95, -148, 8.21328, 226}
StartData
,{-1.13851, 16.7698, amax}
,{4.94396, -92.2394, amin}
,{2.05478, 0.565704, bflat}
EndData
In the above listing of the .mbb file for the preceding example, the third line gives the extents of a rectangle, with aspect ratio 1.6, that just encloses the height of the graphic. The left-hand edge of this rectangle falls roughly 1.294 = 5.24417 - 3.95 horizontal units from the edge of the axis labels on the left.
 ,
indicate accuracy of the alignment.
,
indicate accuracy of the alignment.