PDF export

| Main page |
|
Index |
| Bug list |
| Documentation |
| Doc errors |
| Examples |
| 2D Gallery |
| 3D Gallery |
|
Packages
|
|
References
|
|
CTAN Search CTAN: Germany USA |
|
Statistics |
|
Extended translation of the the 5th edition |
|
the 7th edition, total of 960 colored pages |
|
2nd edition, 212 pages, includes 32 color pages |
|
 |
|
 |
|
 |
|
 |
|
 |
|
|
|
|
|
 |
|
 |
The PSTricks macros cannot be used directly with pdf(La)TeX, because PSTricks uses PostScript arithmetic, which isn't part of PDF. There are several more or less good possibilities to get a PDF output from PostScript. The absolute easiest way is using lualatex or the sequence
latex->dvips->ps2pdf. When using a
GUI,
e.g.
TeXstudio,
there is a often a button for this. If you are using packages which works only with pdflatex or want
to insert png- or jpg-images, then always use lualatex or the package auto-pst-pdf and you can run pdflatex
with PSTricks related code.
lualatex
Since 2021 there exists the package luapstricks.lua which is a replacement for GhostScript if you run your document with lualatex. Then it is automatically be loaded and the PDF output will directly be created without any additional program. Only for examples with exessive mathematical calculations, e.g. for differential equations, it could take very long because the used Lua interpreter is not the fastest machine ...
ps2pdf
This is the absolutely easiest way to convert a complete document or a single PSTricks image to pdf:ps2pdf <file>.ps
dvipdf is no alternative, because it cannot handle the PostScript
prologue files. Use always dvips
and then ps2pdf.
If you use a gui for creating your document, then set your output profile to LaTeX=>PS=>PDF,
then your gui does it all.
To get all images as eps files create a
document, which holds only the PSTricks images (use the following template):
\documentclass{minimal}
\usepackage{pstricks}
\uespackage{pst-...}
\pagestyle{empty}
\begin{document}
...  code for an image ...
\clearpage
...  code for an image ...
\clearpage
...
\end{document}
now run
latex <file>.tex dvips <file>.dvi ps2pdf <file>.ps pdf2eps <pagenumber> <file> |
\usepackage[T1]{fontenc} %
\usepackage{lmodern} % the latin modern font family
pst2pdf
pst2pdf is a Perl script which isolates all PostScript or PSTricks related parts of the document into single LaTeX files, which create an eps and pdf image. The pdf ones are then imported in a last pdflatex run for the pdf output of the main document.
Syntax: pst2pdf.pl <file>.tex [options]
alternative: perl PST2pdf.pl <file>.tex [option]
\begin{postscript}
...
\begin{pspicture}
....
\end{pspicture}
...
\end{postscript}
The pspicture environment can be nested, the postscript one NOT! pspicture can be inside of a postscript environment, but not vice versa.
The postscript environment should be used for all other PostScript related commands, which are not part of a pspicture environment, e.g. nodes inside normal text.
Restrictions for this version: Nested files are not possible! Hence PSTricks in\input and/or \include files cannot be used.
Look into the Perl code for more informations ...
VTeX/Free
The program VTeX for linux from http://www.micropress-inc.com/linux is free available and procuduces a PDF output by default and can handle all pstricks code. See also:http://www.os2voice.org/VNL/past_issues/VNL1203H/vnewsf4.htm
Package pst-pdf
The best solution is to use the package
pst-pdf which
itself needs the newest preview package, available from CTAN.
\documentclass[12pt]{article}

\usepackage{pstricks}
\usepackage{pst-pdf}

\pagestyle{empty}

\begin{document}

\begin{pspicture}(-5.25,-5.25)(5.25,5.25)%
  \pscircle*[linecolor=cyan]{5}
  \psgrid[subgriddiv=0,gridcolor=lightgray,gridlabels=0pt]
  \Huge\sffamily\bfseries
  \rput(-4.5,4.5){A} \rput(4.5,4.5){B}
  \rput(-4.5,-4.5){C}\rput(4.5,-4.5){D}
  \rput(0,0){pst-pdf}
  \rmfamily
  \rput(0,-3.8){PSTricks}
  \rput(0,3.8){\LaTeX}
\end{pspicture}

\includegraphics{foo}% can be foo.jpg or foo.png

\end{document}
There is nothing more to do than loading the package; preview.sty is working in the background and extracts
all important environments. Here you can see the pdf output of the above example.
Load the example file from the website for more information to see how it works.
The most major advantage is, that pst-pdf allows to create EPS images of all PostScript parts of the doc.
There are shell scripts for *nix, Windows and MAC to make it easy to use. Without using one of these scripts you have to
run manually (replace file with your own filename):
latex <file.tex> dvips -Ppdf -o <file-pics.ps> <file.dvi> #ps2pdf -dAutoRotatePages#/None <file-pics.ps> <file-pics.pdf># for Windows user ps2pdf -dAutoRotatePages=/None <file-pics.ps> <file-pics.pdf> pdflatex <file.tex> |
pst-pdf writes with the help of the preview package the pspicture
environment into a special DVI file. It is important, that pspicture has the correct coordinates,
otherwise you'll get not the whole picture (see also topic baseline).
dvips -E writes the contents into a special PS file with one picture - one page. With ps2pdf
this file is converted into PDF images from which the last pdflatex run reads its images page by page and replace all
with the pspicture environments.
Package auto-pst-pdf
simplifies the use of the package pst-pdf. For using the package with LuaTeX
go here.
\documentclass[12pt]{article}

\usepackage{pstricks}
\usepackage{auto-pst-pdf}

\pagestyle{empty}

\begin{document}

\begin{pspicture}(-5.25,-5.25)(5.25,5.25)%
  \pscircle*[linecolor=cyan]{5}
  \psgrid[subgriddiv=0,gridcolor=lightgray,gridlabels=0pt]
  \Huge\sffamily\bfseries
  \rput(-4.5,4.5){A} \rput(4.5,4.5){B}
  \rput(-4.5,-4.5){C}\rput(4.5,-4.5){D}
  \rput(0,0){auto-pst-pdf}
  \rmfamily
  \rput(0,-3.8){PSTricks}
  \rput(0,3.8){\LaTeX}
\end{pspicture}

\includegraphics{foo}% can be foo.jpg or foo.png

\end{document}
Important is the fact, that all PSTricks related code should be inside the pspicture-environment.
Alternative you can use the environment postscript, which can include any kind of code:
\documentclass[12pt]{article}

\usepackage{pstricks}
\usepackage{auto-pst-pdf}

\pagestyle{empty}

\begin{document}

\begin{postscript}
\psset{fillstyle=solid}
\psscalebox{0.75}{%
\begin{pspicture}(-5.25,-5.25)(5.25,5.25)%
  \pscircle*[linecolor=cyan]{5}
  \psgrid[subgriddiv=0,gridcolor=lightgray,gridlabels=0pt]
  \Huge\sffamily\bfseries
  \rput(-4.5,4.5){A} \rput(4.5,4.5){B}
  \rput(-4.5,-4.5){C}\rput(4.5,-4.5){D}
  \rput(0,0){auto-pst-pdf}
  \rmfamily
  \rput(0,-3.8){PSTricks}
  \rput(0,3.8){\LaTeX}
\end{pspicture}}
\end{postscript}

\includegraphics{foo}% can be foo.jpg or foo.png

\end{document}
Now run pdflatex -shell-escape file or alternatively for MikTeX
distributions pdflatex --enable-write18 file. The four steps for creating a
document with a last pdflatex run are now done internally by the package. The package
itself loads pst-pdf by default with the option notightpage,
which makes it easier to define the bounding box of each image. The programs ps2pdf
and pdfcrop must be installed, which should already be the case for
standard TeX distributions like TeXLive or MikTeX. pdfcrop needs an installed
perl, which is the default for Linux. For Windows install the one from
acitivestate.com.
For a GUI like TeXnicCenter insert the -shell-escape option with Alt-F7 (opens the output menu),
choose LaTeX=>PDF and insert in the right window as optional argument "-shell-escape" (without a space between shell and -escape!)), just
before the existing "-interaction=..." argument.
TeXnicCenter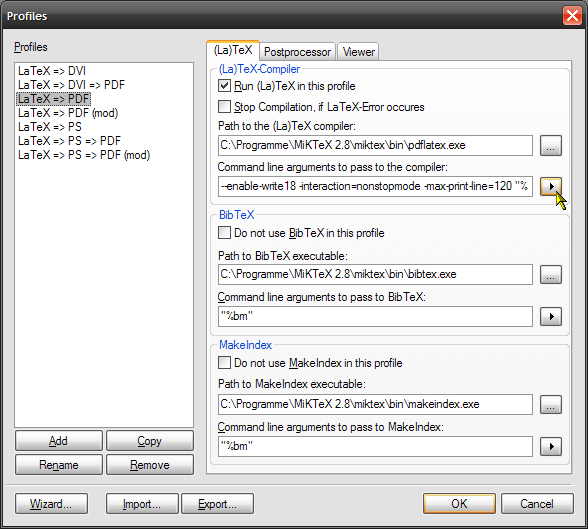 TeXShop
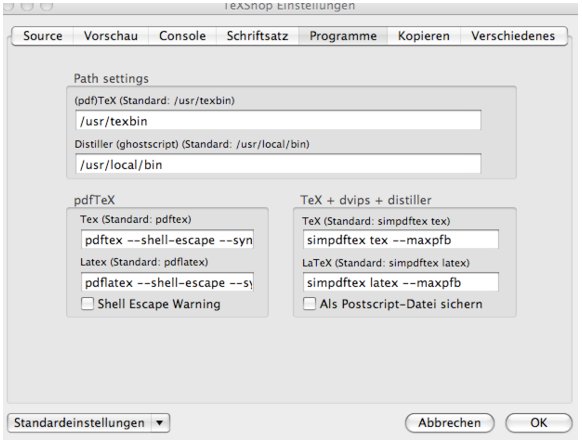 WinEdt
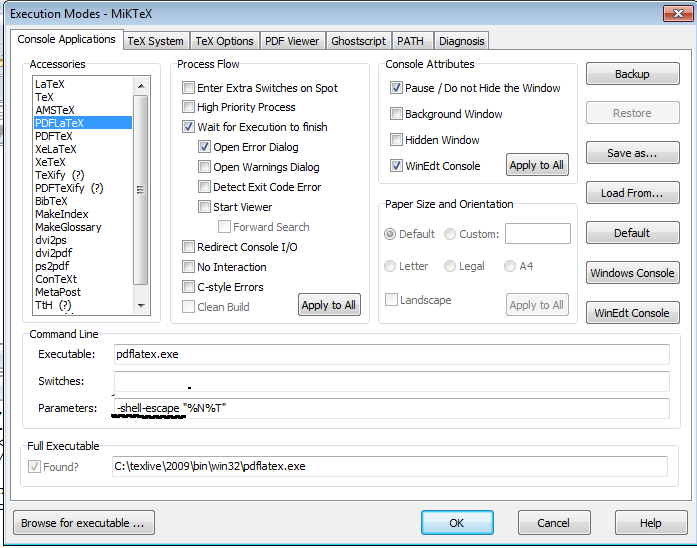 TeXworks
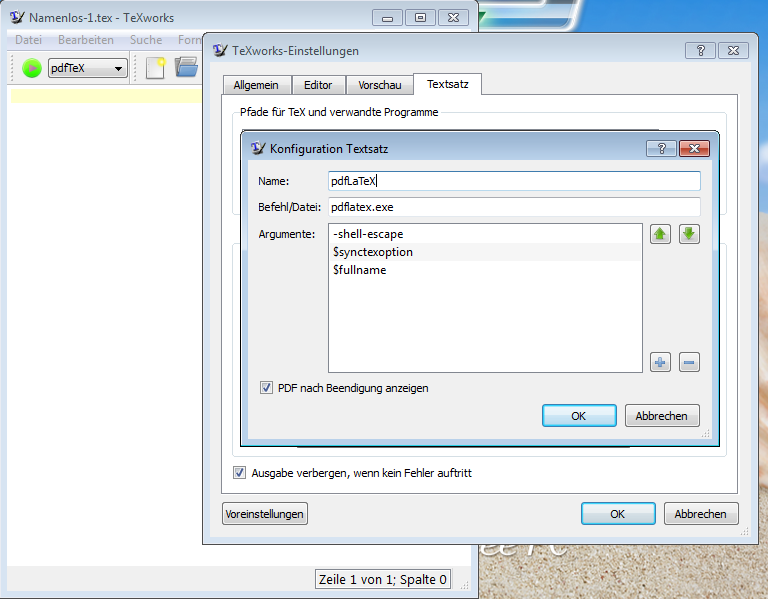 LyX
LyX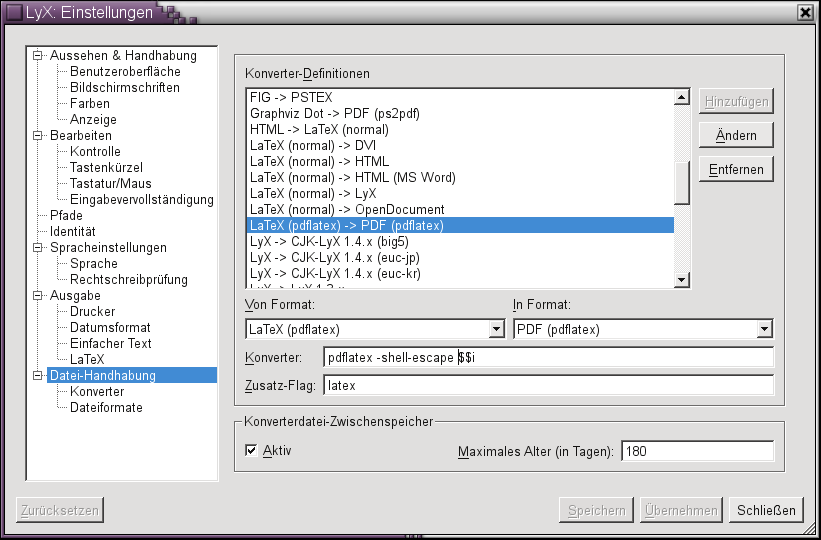
PSTtoEPS, converting into EPS from inside pstricks
The first one is a real pstricks solution, it creates eps-images,
which can be converted with epstopdf to PDF format. You need the package
pst-eps.sty
and the corresponding TeX file pst-eps.tex:
\documentclass{article}
\usepackage{pst-eps,graphicx,epstopdf}
\makeatletter
\newcommand{\pssave}[2]{%
	\PSTtoEPS[%
		headerfile=pstricks.pro,%
		headers=all,%
		bbllx=-2,bblly=-2,bburx=2,bbury=2]
	{#1.eps}{#2}%
}
\makeatother
\parindent=0pt
\begin{document}
\pssave{EPSfileName}{%
    \begin{pspicture}(-2,-2)(2,2)
	\psset{linecolor=red}
	\pscircle{2} % any pstricks stuff
    \end{pspicture}%
}
line before image

\includegraphics{EPSfileName}

line after image
\end{document}
PSTtoEPS is unable to calculate the bounding box. You can pass this values as options to the macro or
leave it blank, then the image gets the default values of 2*2pt. In this case you have to reserve the
space in your text by yourself. The saved EPS image can now be converted into any other format.
epstool
Adjusts the BoundingBox of an existing EPS file which was created by dvips -E.
Also cuts all whitespace around the EPS image. Use the following bash script or run the
commands by hand. epstool is available from
http://www.cs.wisc.edu/~ghost/gsview/epstool.htm for
*nix and Windows.
#!/bin/sh latex $1.tex # run latex (file without extension) dvips -j -E $1.dvi -o $1.eps # run dvips epstool --copy --bbox $1.eps $1.tmp.eps # run epstool mv $1.tmp.eps $1.eps # rename output |
Package pdftricks
Another more elegant way, but much more difficult is to use the pdftricks package.
This package circumvents this limitation so that the extensive facilities offered by the powerful PSTricks
package can be made use of in a pdfTeX document. This is done using the shell escape function available in the
web2c TeX compiler (limiting the use of this package to the web2c implementation of TeX).
[Visit CTAN for more information or
http://PSTricks.tug.org/] MiKTeX users load the package
with option miktex: \usepackage[miktex]{pdftricks} and have to pay attention that they have a
directory called \tmp.
pdflatex --shell-escape <testfile.tex> |
(Linux) |
pdflatex --enable-write18 <testfile.tex> |
(MiKTeX) |
\documentclass[a4paper]{article}
\usepackage{ifpdf}
\ifpdf%
  \usepackage{pdftricks}
  \begin{psinputs}
    \usepackage{pstricks}
  \end{psinputs}
\else
  \usepackage{pstricks}
  \newenvironment{pdfpic}{}{}
\fi

\begin{document}
\section{Hallo}
Welt.

\begin{figure}[htb]
\centering
\caption{The image, converted with \texttt{pdftricks}}
\begin{pdfpic}
  \begin{pspicture}(5,2)
    \psline{|<->|}(0,0.3)(4,1.9)
  \end{pspicture}
\end{pdfpic}
\end{figure}

\end{document}
dvipdfm
Nearly all PSTricks packages uses PostScript header files (ending ".pro"), also called prologue, which cannot be understand bydvipdfm. Use always dvips
and then ps2pdf or alternative the script dvipdf which does the same.
ps4pdf
This package is superceeded by pst-pdf!There exists also a script
ps4pdf, which is independent from the package and allows an easy
use of the package pst-pdf.